
How to Use Metadata Fixer Duplicate Finder
Reading time: 11 minutes
Metadata Fixer Duplicate Finder scans one folder and everything below it, separates byte-identical files from visually similar photos, and lets you choose exactly what is deleted. The important part is choosing the right scan root. If two copies live under different album or year folders, both folders must sit inside the folder you select.
This tutorial covers the current Duplicate Finder interface from the first Browse Folder… button through permanent deletion. If the duplicates came from a Google export and you want to understand why they exist before removing anything, read why Google Takeout creates duplicate photos first.
Deletion is permanent
Duplicate Finder does not send files to the Trash or Recycle Bin. Delete Now deletes one file immediately. Delete Selected asks for confirmation, then permanently deletes the marked files in the active Exact or Similar tab. Keep a separate backup until the cleaned library has been checked in your normal photo app.
Before You Scan: Choose the Complete Library Folder
Duplicate Finder only compares files inside the folder you give it, but the scan is recursive: every nested folder is included. Select the highest common parent that contains all copies you want compared.
Fixed Google Photos/          ← select this folder
├── Photos from 2022/
├── Photos from 2023/
├── Family album/
└── Holiday album/
Selecting only Photos from 2023 cannot find its duplicate copy in Holiday album. For a whole-library cleanup, select the parent of every year and album folder. Multiple old Takeout exports can also sit below the same parent if the goal is to compare them with each other.
Work on the processed output, not the original Takeout zip files. Restore dates and other metadata first, then scan the resulting photo folder. That keeps the source export available as a backup and avoids deleting a file before its sidecar metadata has been applied.
Open Duplicate Finder and Start a Scan
There are three useful ways into Duplicate Finder:
- From the Metadata Fixer menu: choose Plugins → Find Duplicates. This opens the Duplicate Finder start screen, where you can browse for a new folder or reopen a previous run.
- From a completed Metadata Fixer results screen: click Find Duplicates. Duplicate Finder opens with that run's completed output folder already selected and starts a fresh scan of it. This is the shortest path after repairing a Takeout library.
- From Recent successful scans: open Duplicate Finder from the menu, then click a previous run's row. This loads that run's stored results without scanning the folder again. Use this route when you are continuing an earlier review.
To start a different scan, click Browse Folder… and select the complete library folder described above. Choosing it starts the scan immediately. On Analyzing photos for duplicates, watch the phase and file count. Cancel Scan stops the current scan and returns to folder selection.
The scanner first inventories the folder, then uses SHA-256 fingerprints where needed to find exact copies. It can show exact groups while visual analysis is still running. A blue Scanning badge (with a percentage when available) means results are still arriving; wait for the green Scan complete badge before making bulk decisions or using Auto Mark.
Exact vs Similar Results
The review screen has two tabs. The number beside each tab is the number of duplicate groups, not the number of files.
| Tab | What qualifies | How to review it |
|---|---|---|
| Exact | Files with identical content. Names and folders may differ. | Decide which folder or filename you want to keep. The file bytes are the same. |
| Similar | Images with close visual fingerprints: bursts, crops, edits, or re-encoded copies. | Compare every candidate. Similar does not mean interchangeable. |
Exact matching applies to the files found in the folder, including videos. Visual similarity is an image analysis. Videos can appear in the review pane and be deleted, but the app does not play them there; it shows Video preview unavailable instead.
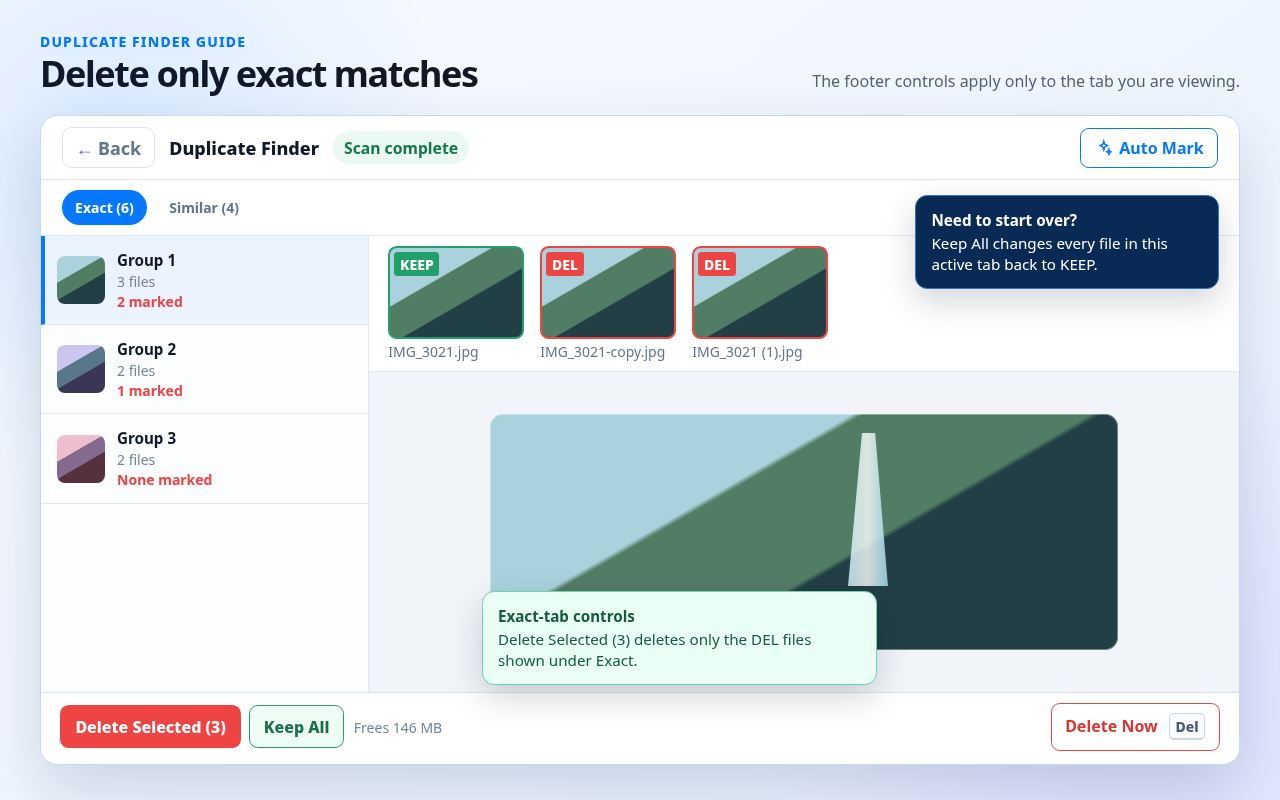
The footer is scoped to the tab you are viewing. On Exact, Delete Selected (n) counts and deletes only Exact files marked DEL; marks in Similar are left alone. Keep All likewise changes every file in the active tab back to KEEP. This makes an exact-only cleanup straightforward: stay on Exact, review the marked copies, verify its count, and confirm Delete Selected.
Strict, Balanced, and Broad Sensitivity
Sensitivity only changes the Similar tab. It does not turn exact matches into uncertain ones, and it does not change the Exact results. The current app calls the loosest option Broad (some people describe that behavior as “Loose”).
- Strict: the narrowest visual match. Use it for near-identical frames and a shorter, higher-confidence review list.
- Balanced: allows more visual difference. Use it when Strict misses light edits, recompression, or modest crops.
- Broad: the loosest setting and widest search. It can surface more useful candidates, but unrelated images with a similar composition are more likely to share a group. Review every file carefully.
Choose a value from the Sensitivity menu on the Similar tab. The app immediately re-analyzes the existing scan at the new threshold; the small spinner shows that work is in progress. If the result screen says No duplicates found, the same menu appears there with a Re-analyze with new threshold button. A sensible sequence is Strict, then Balanced, then Broad only if you still expect missing matches.
How to Review and Mark Duplicate Files
All files begin marked KEEP. Finding a duplicate does not silently queue it for deletion. Select a group in the left column; each row shows its first thumbnail, file count, total size, and how many files are currently marked to delete. The large pane shows the selected image, its relative path, and its size. Click a thumbnail to preview a different file.
- Green KEEP / red DEL: the label and border show the current decision for each thumbnail.
- Unselect: marks the previewed KEEP file for deletion. The label changes to DEL.
- Select to Keep: removes the deletion mark from a DEL file and returns it to KEEP.
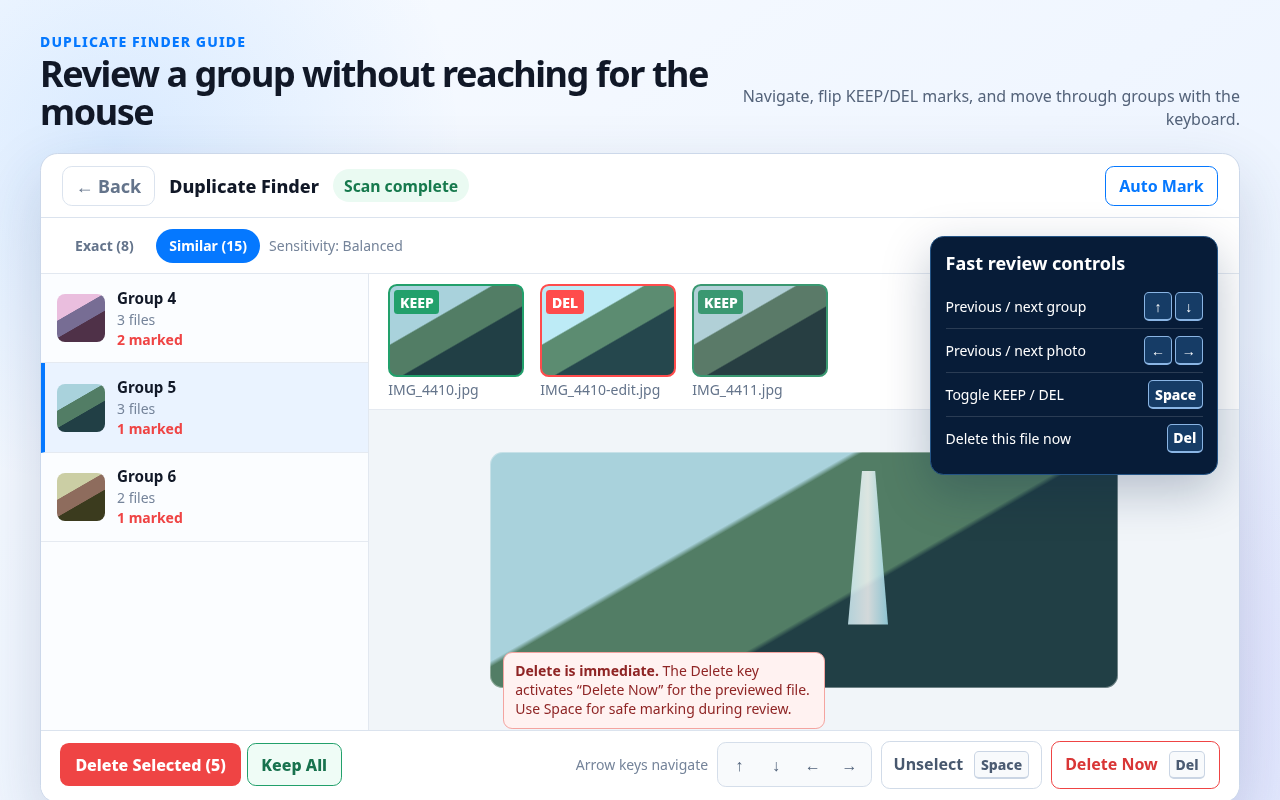
- Space: toggles the previewed file between KEEP and DEL.
- Keep All: clears every DEL mark in the active tab and returns those files to KEEP. It is a quick way to reset Exact or Similar without changing the other tab.
- Arrow Left / Right: moves between files in the current group.
- Arrow Up / Down: moves between duplicate groups.
- Previous files / Next files: appears for unusually large groups and pages through their files.
- Previous / Next beside the tab bar: pages through result groups when a category contains more than one page.
Duplicate Finder will not let you mark every file in a group for deletion; at least one copy must remain. Path matters more than thumbnail appearance for exact copies. In a Takeout cleanup, for example, you may prefer the copy in a year folder over the copy in an album folder—or the reverse if preserving that album layout matters more.
Use Auto Mark Without Giving Up the Final Decision
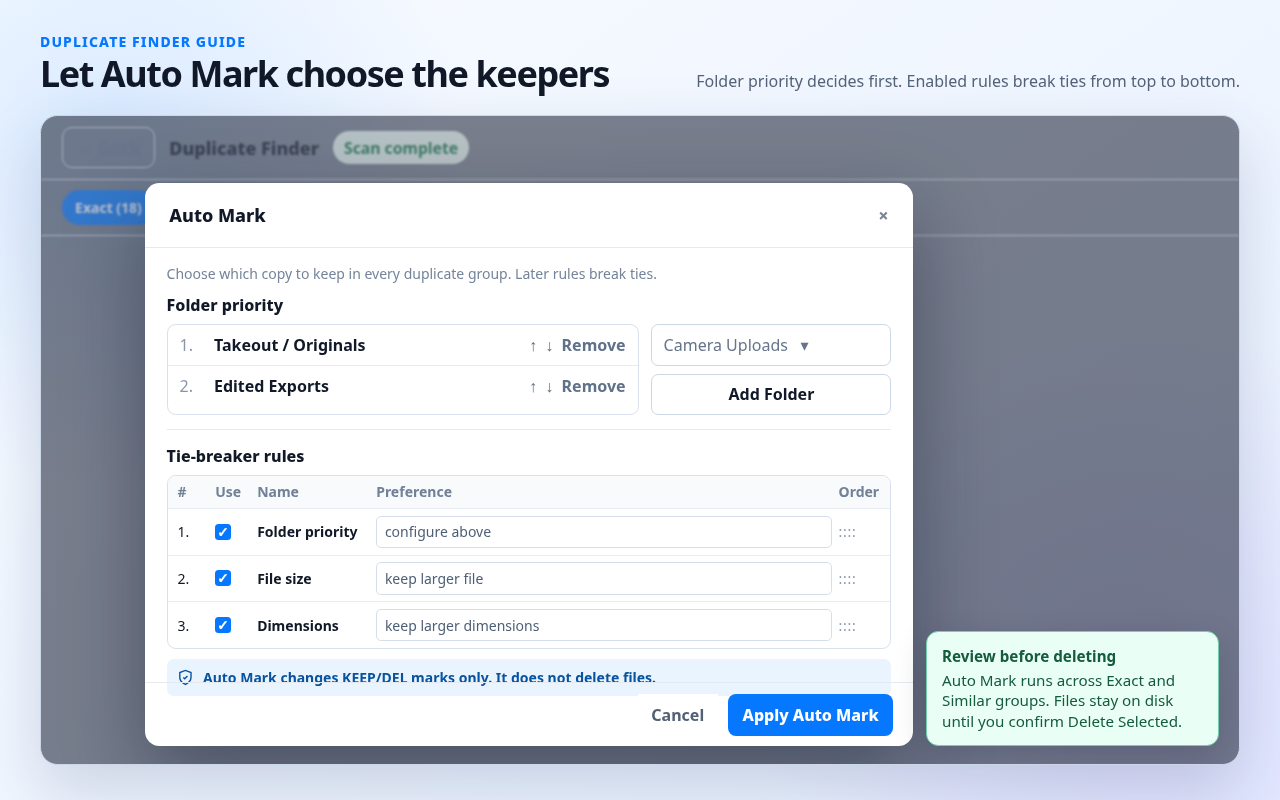
Auto Mark chooses one keeper in each exact and similar group after scanning completes. Unlike the tab-scoped Delete Selected and Keep All buttons, Auto Mark currently applies its rules across both tabs. It changes KEEP/DEL marks only and never deletes files by itself.
In the Auto Mark dialog, Folder priority lets you add folders and move them up or down. Copies in a higher-priority folder win before later rules are considered. The Tie-breaker rules are applied from top to bottom, with later enabled rules breaking ties. Drag the handle—or focus it and use the arrow keys—to reorder rules; use the checkbox to enable or disable a rule; use its menu to choose the preference.
| Auto Mark rule | Available preference |
|---|---|
| File size | Larger or smaller |
| DPI | Higher or lower |
| Dimensions | Larger or smaller |
| Created date | Earlier or later |
| Date taken | Earlier or later |
| File type | Compatibility, RAW, JPEG, HEIC/HEIF, PNG/TIFF, MP4/M4V, or MOV |
| File name | Shorter or longer |
| File path | Shallower, deeper, shorter, or longer |
| GPS | Prefer a file with or without GPS coordinates |
The defaults favor a larger file, larger dimensions, an earlier capture time, and a file with GPS data. Click Apply Auto Mark, wait while metadata is read, and then review the resulting red DEL marks—especially every Similar group. Cancel or the close button leaves the dialog without applying its current configuration. Extremely large groups may be left unchanged so they can be handled manually.
Delete Selected vs Delete Now
- Delete Selected (n): removes files marked DEL in the active tab only. The count and estimated reclaimed space are for that Exact or Similar tab. A confirmation dialog repeats the file count and space; Cancel backs out, while the final button names the active tab—for example, Delete 12 Exact Files.
- Keep All: changes all files in the active tab back to KEEP. Use it when you want to discard the current Exact or Similar selections and review that tab again.
- Delete Now: permanently removes only the currently previewed file, immediately. The Delete keyboard key does the same thing. There is no batch confirmation for this action.
After deletion, the result groups update. If a file was moved or deleted outside Duplicate Finder, the app can remove it from the displayed results and show an orange “no longer on disk” notice. Click Rescan there when the folder has changed enough that the stored result is no longer trustworthy.
Recent Scans, Reopening Results, and Re-scanning
Use ← Back on the review screen to return to folder selection. Under Recent successful scans, each row shows the scanned folder, completion time, and file count. Click anywhere on the row to reopen the saved run. Click its separate Re-scan button only when you want a new scan of that folder.
Reopening a row is fast because Metadata Fixer stores the run locally: the selected folder, file inventory, Exact and Similar result groups, and the KEEP/DEL review selections. It reads those stored results instead of walking the library and hashing its files again. The files themselves are not cached or copied. Keep the original drive connected because previews and deletion still use the real files at their original paths.
| Action | What Duplicate Finder reuses | What it recalculates |
|---|---|---|
| Open a recent successful scan | The complete stored run and its review selections | Nothing until you request another action |
| Change Strict, Balanced, or Broad | The stored scan, Exact results, and cached visual fingerprints for unchanged images | Similar groups at the new sensitivity |
| Re-scan | Cached visual fingerprints may speed up the Similar stage for unchanged images | The folder inventory, Exact results, and final Similar grouping |
Changing Similar sensitivity automatically starts a re-analysis. It is normally much faster than the first scan because unchanged images already have cached visual fingerprints. Duplicate Finder still checks the folder and rebuilds the Similar groups at the new threshold, so a very large library or a slow external drive can take some time. Exact results do not change.
Re-scan solves a different problem. It creates a fresh inventory and fresh results, so use it after adding, moving, renaming, editing, or externally deleting files. Its Similar stage may benefit from cached fingerprints, but it is still substantially more work than reopening a saved run or changing sensitivity. Saved results and fingerprints are performance caches, not a snapshot or backup of the library.
Scanning an External Drive Safely
- Connect and unlock the drive before opening a saved scan.
- Make sure the drive is writable if you intend to delete duplicates.
- Reconnect it at the same drive letter on Windows or the same mounted path on macOS before using stored results.
- Do not disconnect, eject, or let the drive sleep during scanning or deletion.
- If the contents changed while disconnected, use Re-scan instead of trusting the cached groups.
Duplicate Finder preserves recent scan history when a recognized external volume is temporarily unavailable, so a disconnected drive may still appear in the list. That does not mean its files are accessible. Reconnect it first.
A Safe Whole-Library Workflow
- Keep the original export or another full backup untouched.
- Finish metadata repair, then select the single parent folder containing the processed library.
- Wait for Scan complete.
- Review Exact groups first and mark unwanted folder copies. Use Delete Selected while Exact is active to remove only those exact copies.
- Review Similar groups on Strict, then widen to Balanced or Broad only if needed.
- Optionally apply Auto Mark, then inspect its choices before deleting.
- Use Delete Selected and read the confirmation count. Avoid Delete Now until you are comfortable with the review pane.
- Open the cleaned library in its destination photo app and check dates, albums, Live Photos, videos, and a sample from each year before removing the backup.
Frequently Asked Questions
Which folder should I select in Metadata Fixer Duplicate Finder?
Select the highest folder that contains the whole library you want to compare. Duplicate Finder scans that folder and all folders inside it, so choosing the common parent lets it find copies stored in different year, album, and export folders.
What is the difference between Exact and Similar duplicates?
Exact groups contain byte-for-byte identical files, even when their names or folders differ. Similar groups contain photos that look alike but may be different files, such as bursts, crops, edits, or re-encoded copies. Similar results always require visual review.
Which similarity sensitivity should I use?
Start with Strict when you want the closest visual matches and the shortest review list. Balanced includes more variation. Broad is the loosest setting and finds the widest range of possible matches, but it also needs the most careful review. The current app labels the loosest setting Broad, not Loose.
Does changing sensitivity scan every file again?
It does not rebuild the full inventory or Exact results. Duplicate Finder re-runs Similar grouping at the new threshold and reuses cached visual fingerprints for unchanged images, so this is normally much faster than the first scan. It still checks the selected folder and rebuilds the Similar groups. Use Re-scan after files have been added, moved, renamed, or changed on disk.
What does Duplicate Finder cache?
A completed run stores its selected folder, file inventory, Exact and Similar result groups, and review selections in Metadata Fixer. Duplicate Finder also caches visual fingerprints for unchanged images. Opening a row under Recent successful scans loads the stored results without scanning again. Re-scan creates a fresh inventory, although its Similar stage can still reuse visual fingerprints for unchanged images.
Does Duplicate Finder move deleted files to the Trash or Recycle Bin?
No. Delete Now and Delete Selected permanently delete files from disk. Delete Selected shows a confirmation with the number of marked files in the active Exact or Similar tab and the space to reclaim; Delete Now removes the previewed file immediately. Keep a backup and review every selection first.
Can I delete only exact duplicate files?
Yes. Open the Exact tab, review and mark the unwanted identical copies, then use Delete Selected. Delete Selected and Keep All apply only to the active tab, so marks in Similar are not included while Exact is active.
Can Duplicate Finder scan an external drive?
Yes, provided the drive is connected, writable, and mounted at the same location. A saved scan is only a record of results, not a copy of the files. Reconnect the drive before reopening results or deleting, and use Re-scan if its contents changed.
Fix the Library, Then Remove the Duplicates
The Complete Bundle includes Metadata Fixer for dates and locations plus Duplicate Finder for exact and visually similar copies, along with the image and video repair plugins for files that fail along the way.
Get the Complete Bundle