How to Export Google Photos With Takeout
This guide will walk you through the complete process of exporting your images from Google Photos using Google Takeout, fixing the EXIF metadata, and importing them into iCloud or another photo library.
Why Use Google Takeout?
While Google Photos has a native export function, it's restricted to 500 files at a time, which can take a very long time for large libraries. Google Takeout provides a more efficient solution, allowing you to export your entire photo library at once as downloadable archive files.
Downloading All Files From Google Photos
Step 1: Access Google Takeout
Navigate to takeout.google.com/settings/takeout and sign in with your Google account. This service allows you to download archives of your Google Account data.
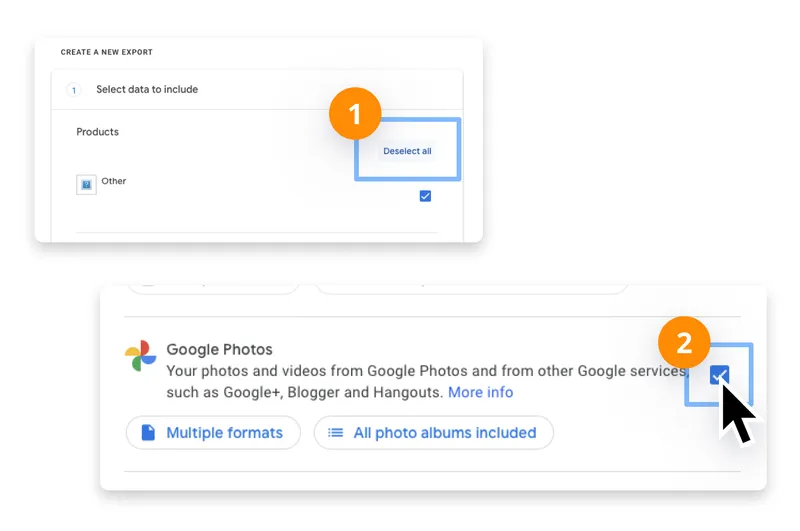
Step 2: Select Google Photos
Deselect all options and only select Google Photos. Choose the albums or all photos you want to export. This ensures you only download your photos without other Google data.
Step 3: Configure Export Settings
Choose your preferred file type, frequency, and destination. We recommend selecting "Multiple files" with a maximum size of 2GB or 4GB to avoid very large single files that are harder to download and extract.
Step 4: Create Export
Click "Create export" and wait for Google to prepare your files. Depending on the size of your library, this can take anywhere from a few minutes to several hours. You'll receive an email when it's ready.
Step 5: Download Your Files
Once you receive the email, download all the zip files. You'll find .json sidecar files alongside your photos — these contain your dates and locations and need to be merged back in.

Large library (10GB+)? Browser downloads often fail for big exports. Our reliable download guide covers how to use rclone for automatic resume and checksum verification.
Don't want to deal with Google Takeout? Snapback is our free Chrome extension that downloads your Google Photos library directly from your browser.
Fixing Your Photo Metadata
Your Takeout download includes .json sidecar files next to every photo. These contain the dates, GPS locations, and descriptions that Google stripped from the actual image files. If you import photos without fixing this first, everything will show the wrong date. Our Google Takeout JSON files guide explains exactly what they contain and your options for handling them.
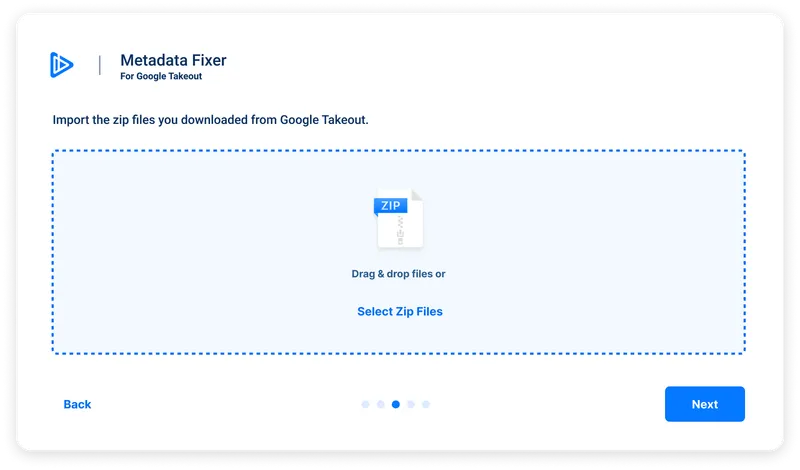
The fastest fix: point Metadata Fixer at your Takeout zip files and it writes everything back into your photos automatically — dates, locations, descriptions, the lot. No extraction, no command line.
Moving Your Library to iCloud
After fixing your metadata, you can import your photos into iCloud or Apple Photos:
- Open Photos.app on your Mac and use File > Import rather than dragging files directly. This ensures proper handling of the metadata.
- If any photos appear misdated after import, you can manually correct them using Image > Adjust Date and Time.
Managing Your Existing Google Photos Library
If you have the Google Photos app installed on your phone, be aware that it may recognize the newly imported iCloud photos and attempt to upload them as duplicates.
To handle this:
- After the upload completes, visit photos.google.com/search/_tra_ to identify recently uploaded files.
- Delete the newly uploaded duplicates from this view.
- Google Photos won't re-upload files that you've already deleted, but it will continue capturing future photos from your phone normally.
Frequently Asked Questions
How long does Google Takeout take to prepare?
It depends on your library size. A few thousand photos might be ready in minutes. Large libraries (50,000+ photos) can take several hours or even a day. Google will email you when it's ready.
Why does Takeout split my export into multiple zip files?
Large exports are split into multiple files (usually 2GB each) to make downloading more manageable. A 50GB library might produce 25 separate zip files. This is normal - Metadata Fixer can process them all at once.
Can I export only specific albums from Google Photos?
Yes. When setting up Takeout, click "All photo albums included" and deselect "Include all albums." You can then pick specific albums to export. This is useful if you only need certain years or events.
Will exporting delete my photos from Google Photos?
No. Google Takeout creates a copy of your photos. Your originals remain in Google Photos untouched. You can delete them later if you want to free up space.
What's the difference between "Download link" and "Add to Drive"?
"Download link" sends files through your browser, which often fails for large exports. "Add to Drive" saves files to your Google Drive, where you can download them more reliably with rclone. Use "Add to Drive" for anything over a few GB.
Ready to fix your metadata?
Download Metadata Fixer and restore all your photo metadata in minutes. No technical knowledge required.
Download Now